目录
- 前言
- 一、YOLOv8-Seg推理(Python)
- 1. YOLOv8-Seg预测
- 2. YOLOv8-Seg预处理
- 3. YOLOv8-Seg后处理
- 4. YOLOv8-Seg推理
- 二、YOLOv8-Seg推理(C++)
- 1. ONNX导出
- 2. YOLOv8-Seg预处理
- 3. YOLOv8-Seg后处理
- 4. YOLOv8推理
- 三、YOLOv8-Seg部署
- 1. 源码下载
- 2. 环境配置
- 2.1 配置CMakeLists.txt
- 2.2 配置Makefile
- 3. ONNX导出
- 4. 源码修改
- 结语
- 下载链接
- 参考
前言
梳理下 YOLOv8-Seg 的预处理和后处理流程,顺便让 tensorRT_Pro 支持 YOLOv8-Seg
参考:https://github.com/shouxieai/tensorRT_Pro
实现:https://github.com/Melody-Zhou/tensorRT_Pro-YOLOv8
一、YOLOv8-Seg推理(Python)
1. YOLOv8-Seg预测
我们先尝试利用官方预训练权重来推理一张图片并保存,看能否成功
在 YOLOv8 主目录下新建 predict-seg.py 预测文件,其内容如下:
import cv2
import numpy as np
from ultralytics import YOLO

def hsv2bgr(h, s, v):
    h_i = int(h * 6)
    f = h * 6 - h_i
    p = v * (1 - s)
    q = v * (1 - f * s)
    t = v * (1 - (1 - f) * s)

    r, g, b = 0, 0, 0

    if h_i == 0:
        r, g, b = v, t, p
    elif h_i == 1:
        r, g, b = q, v, p
    elif h_i == 2:
        r, g, b = p, v, t
    elif h_i == 3:
        r, g, b = p, q, v
    elif h_i == 4:
        r, g, b = t, p, v
    elif h_i == 5:
        r, g, b = v, p, q

    return int(b * 255), int(g * 255), int(r * 255)

def random_color(id):
    h_plane = (((id << 2) ^ 0x937151) % 100) / 100.0
    s_plane = (((id << 3) ^ 0x315793) % 100) / 100.0
    return hsv2bgr(h_plane, s_plane, 1)

if __name__ == "__main__":

    model = YOLO("yolov8s-seg.pt")

    img = cv2.imread("ultralytics/assets/bus.jpg")
    result = model(img)[0]
    names = result.names
    boxes = result.boxes.data.tolist()
    masks = result.masks

    h, w = img.shape[:2]

    for i, mask in enumerate(masks.data):

        mask = mask.cpu().numpy().astype(np.uint8)
        mask_resized = cv2.resize(mask, (w, h))

        label = int(boxes[i][5])
        color = np.array(random_color(label))

        colored_mask = (np.ones((h, w, 3)) * color).astype(np.uint8)
        masked_colored_mask = cv2.bitwise_and(colored_mask, colored_mask, mask=mask_resized)

        mask_indices = mask_resized == 1
        img[mask_indices] = (img[mask_indices] * 0.6 + masked_colored_mask[mask_indices] * 0.4).astype(np.uint8)

    # for i, points in enumerate(masks.xy):
    #     label = int(boxes[i][5])
    #     color = random_color(label)
    #     points = np.array(points, np.int32)
    #     cv2.drawContours(img, [points], -1, color, 2)

    for obj in boxes:
        left, top, right, bottom = int(obj[0]), int(obj[1]), int(obj[2]), int(obj[3])
        confidence = obj[4]
        label = int(obj[5])
        color = random_color(label)
        cv2.rectangle(img, (left, top), (right, bottom), color = color ,thickness=2, lineType=cv2.LINE_AA)
        caption = f"{names[label]} {confidence:.2f}"
        w, h = cv2.getTextSize(caption, 0, 1, 2)[0]
        cv2.rectangle(img, (left - 3, top - 33), (left + w + 10, top), color, -1)
        cv2.putText(img, caption, (left, top - 5), 0, 1, (0, 0, 0), 2, 16)

    cv2.imwrite("predict-seg.jpg", img)
    print("save done")
在上述代码中我们通过 opencv 读取了一张图像,并送入模型中推理得到输出 results,results 中保存着不同任务的结果,我们这里是分割任务,因此只需要拿到对应的 boxes 和 masks 即可。
拿到 boxes 后我们就可以将对应的框和置信度绘制在图像上,拿到 masks 后我们就可以将对应的 mask 绘制在图像上并保存。
关于 boxes 可视化的代码实现参考自 tensorRT_Pro 中的实现,可以参考:app_yolo.cpp#L95
关于 masks 可视化的代码实现参考自 ultralytics/utils/plotting.py 中的实现,具体实现代码来源于 chatGPT,可以参考:plotting.py#L468
关于随机颜色的代码实现参考自 tensorRT_Pro 中的实现,可以参考:ilogger.cpp#L90
模型推理保存的结果图像如下所示:

2. YOLOv8-Seg预处理
模型预测成功后我们就需要自己动手来写下 YOLOv8-Seg 的预处理和后处理,方便后续在 C++ 上的实现,我们先来看看预处理的实现
经过我们的调试分析可知 YOLOv8-Seg 的预处理过程在 ultralytics/engine/predictor.py 文件中,可以参考:predictor.py#L111
代码如下:
def preprocess(self, im):
    """
    Prepares input image before inference.

    Args:
        im (torch.Tensor | List(np.ndarray)): BCHW for tensor, [(HWC) x B] for list.
    """
    not_tensor = not isinstance(im, torch.Tensor)
    if not_tensor:
        im = np.stack(self.pre_transform(im))
        im = im[..., ::-1].transpose((0, 3, 1, 2))  # BGR to RGB, BHWC to BCHW, (n, 3, h, w)
        im = np.ascontiguousarray(im)  # contiguous
        im = torch.from_numpy(im)

    im = im.to(self.device)
    im = im.half() if self.model.fp16 else im.float()  # uint8 to fp16/32
    if not_tensor:
        im /= 255  # 0 - 255 to 0.0 - 1.0
    return im
它包含以下步骤:
- self.pre_transform:即 letterbox 添加灰条
- im[…,::-1]:BGR → RGB
- transpose((0, 3, 1, 2)):添加 batch 维度,HWC → CHW
- torch.from_numpy:to Tensor
- im /= 255:除以 255,归一化
大家如果对 YOLOv5 的预处理熟悉的话,会发现 YOLOv8-Seg 的预处理和 YOLOv5 的预处理一模一样,因此我们不难写出对应的预处理代码,如下所示:
def preprocess_warpAffine(image, dst_width=640, dst_height=640):
    scale = min((dst_width / image.shape[1], dst_height / image.shape[0]))
    ox = (dst_width  - scale * image.shape[1]) / 2
    oy = (dst_height - scale * image.shape[0]) / 2
    M = np.array([
        [scale, 0, ox],
        [0, scale, oy]
    ], dtype=np.float32)

    img_pre = cv2.warpAffine(image, M, (dst_width, dst_height), flags=cv2.INTER_LINEAR,
                             borderMode=cv2.BORDER_CONSTANT, borderValue=(114, 114, 114))
    IM = cv2.invertAffineTransform(M)

    img_pre = (img_pre[...,::-1] / 255.0).astype(np.float32)
    img_pre = img_pre.transpose(2, 0, 1)[None]
    img_pre = torch.from_numpy(img_pre)
    return img_pre, IM
其中的 letterbox 添加灰条步骤我们可以通过仿射变换 warpAffine 实现,warpAffine 非常适合在 CUDA 上加速,关于 warpAffine 仿射变换的细节大家可以参考 YOLOv5推理详解及预处理高性能实现,这边不再赘述。其它步骤倒是和官方的没有区别。
值得注意得是,letterbox 的操作是先将长边缩放到 640,再将短边按比例缩放,同时确保缩放后的短边能整除 32,如果不能则向上取整多余部分填充。warpAffine 的操作则是将图像分辨率固定在 640x640,多余部分添加灰条,博主对一张 1080x810 分辨率的图像经过两种不同预处理后的结果进行了对比,如下图所示:


可以看到二者明显的差别,letterbox 中没有灰条,因为长边缩放到 640 后短边刚好缩放到 480,能整除 32。而 warpAffine 则是固定分辨率 640x640,因此短边多余部分将用灰条填充。
warpAffine 预处理方法将图像分辨率固定在 640x640,主要有以下几点考虑:(from chatGPT)
- 简化处理逻辑:所有预处理后的图像分辨率相同,可以简化 CUDA 中并行处理的逻辑,使得代码更易于编写和维护。
- 优化内存访问:在 GPU 上,连续的内存访问模式通常比非连续的访问更高效。如果所有图像具有相同的大小和布局,这可以帮助优化内存访问,提高处理速度。
- 避免动态内存分配:动态内存分配和释放是昂贵的操作,特别是在 GPU 上。固定分辨率意味着可以预先分配足够的内存,而不需要根据每个图像的大小动态调整内存大小。
这两种不同的预处理方法生成的图片输入到神经网络时的维度不同,letterbox 的输入是 torch.Size([1, 3, 640, 480]),warpAffine 的输入是 torch.Size([1, 3, 640, 640])。由于输入维度不同将导致模型输出维度的差异,leetrbox 的输出是 torch.Size([1, 56, 6300]) 只有 6300 个框,而 warpAffine 的输出是 torch.Size([1, 56, 8400]) 有 8400 个框,这点大家需要清楚。
3. YOLOv8-Seg后处理
我们再来看看后处理的实现
经过我们的调试分析可知 YOLOv8-Seg 的后处理部分在 ultralytics/models/yolo/segment/predict.py 文件中,可以参考:segment/predict.py#L28
class SegmentationPredictor(DetectionPredictor):
    """
    A class extending the DetectionPredictor class for prediction based on a segmentation model.

    Example:
        ```python
        from ultralytics.utils import ASSETS
        from ultralytics.models.yolo.segment import SegmentationPredictor

        args = dict(model='yolov8n-seg.pt', source=ASSETS)
        predictor = SegmentationPredictor(overrides=args)
        predictor.predict_cli()

    """

    def __init__(self, cfg=DEFAULT_CFG, overrides=None, _callbacks=None):
        """Initializes the SegmentationPredictor with the provided configuration, overrides, and callbacks."""
        super().__init__(cfg, overrides, _callbacks)
        self.args.task = 'segment'

    def postprocess(self, preds, img, orig_imgs):
        """Applies non-max suppression and processes detections for each image in an input batch."""
        p = ops.non_max_suppression(preds[0],
                                    self.args.conf,
                                    self.args.iou,
                                    agnostic=self.args.agnostic_nms,
                                    max_det=self.args.max_det,
                                    nc=len(self.model.names),
                                    classes=self.args.classes)

        if not isinstance(orig_imgs, list):  # input images are a torch.Tensor, not a list
            orig_imgs = ops.convert_torch2numpy_batch(orig_imgs)

        results = []
        proto = preds[1][-1] if len(preds[1]) == 3 else preds[1]  # second output is len 3 if pt, but only 1 if exported
        for i, pred in enumerate(p):
            orig_img = orig_imgs[i]
            img_path = self.batch[0][i]
            if not len(pred):  # save empty boxes
                masks = None
            elif self.args.retina_masks:
                pred[:, :4] = ops.scale_boxes(img.shape[2:], pred[:, :4], orig_img.shape)
                masks = ops.process_mask_native(proto[i], pred[:, 6:], pred[:, :4], orig_img.shape[:2])  # HWC
            else:
                masks = ops.process_mask(proto[i], pred[:, 6:], pred[:, :4], img.shape[2:], upsample=True)  # HWC
                pred[:, :4] = ops.scale_boxes(img.shape[2:], pred[:, :4], orig_img.shape)
            results.append(Results(orig_img, path=img_path, names=self.model.names, boxes=pred[:, :6], masks=masks))
        return results
它包含以下步骤:
- ops.non_max_suppression:非极大值抑制,即 NMS
- ops.process_mask:mask 的处理
- ops.scale_boxes:框的解码,即 decode boxes
大家如果对 YOLOv5 的后处理熟悉的话,会发现 YOLOv8-Seg 的后处理中检测框的处理和 YOLOv5 中的基本一样,只是需要大家额外处理下 mask,因此我们不难写出对应的后处理代码,如下所示:
def iou(box1, box2):
    def area_box(box):
        return (box[2] - box[0]) * (box[3] - box[1])

    left, top = max(box1[:2], box2[:2])
    right, bottom = min(box1[2:4], box2[2:4])
    union = max((right-left), 0) * max((bottom-top), 0)
    cross = area_box(box1) + area_box(box2) - union
    if cross == 0 or union == 0:
        return 0
    return union / cross

def NMS(boxes, iou_thres):

    remove_flags = [False] * len(boxes)

    keep_boxes = []
    for i, ibox in enumerate(boxes):
        if remove_flags[i]:
            continue

        keep_boxes.append(ibox)
        for j in range(i + 1, len(boxes)):
            if remove_flags[j]:
                continue

            jbox = boxes[j]
            if(ibox[5] != jbox[5]):
                continue
            if iou(ibox, jbox) > iou_thres:
                remove_flags[j] = True
    return keep_boxes

def postprocess(pred, conf_thres=0.25, iou_thres=0.45):

    # 输入是模型推理的结果,即8400个预测框
    # 1,8400,116 [cx,cy,w,h,class*80,32]
    boxes = []
    for item in pred[0]:
        cx, cy, w, h = item[:4]
        label = item[4:-32].argmax()
        confidence = item[4 + label]
        if confidence < conf_thres:
            continue
        left    = cx - w * 0.5
        top     = cy - h * 0.5
        right   = cx + w * 0.5
        bottom  = cy + h * 0.5
        boxes.append([left, top, right, bottom, confidence, label, *item[-32:]])

    boxes = sorted(boxes, key=lambda x:x[4], reverse=True)

    return NMS(boxes, iou_thres)

def crop_mask(masks, boxes):

    # masks -> n, 160, 160  原始 masks
    # boxes -> n, 4         检测框,映射到 160x160 尺寸下的
    n, h, w = masks.shape
    x1, y1, x2, y2 = torch.chunk(boxes[:, :, None], 4, 1)  # x1 shape(n,1,1)
    r = torch.arange(w, device=masks.device, dtype=x1.dtype)[None, None, :]  # rows shape(1,1,w)
    c = torch.arange(h, device=masks.device, dtype=x1.dtype)[None, :, None]  # cols shape(1,h,1)

    return masks * ((r >= x1) * (r < x2) * (c >= y1) * (c < y2))

def process_mask(protos, masks_in, bboxes, shape, upsample=False):

    # protos   -> 32, 160, 160 分割头输出
    # masks_in -> n, 32        检测头输出的 32 维向量,可以理解为 mask 的权重
    # bboxes   -> n, 4         检测框
    # shape    -> 640, 640     输入网络中的图像 shape
    # unsample 一个 bool 值,表示是否需要上采样 masks 到图像的原始形状
    c, mh, mw = protos.shape  # CHW
    ih, iw = shape
    # 矩阵相乘 nx32 @ 32x(160x160) -> nx(160x160) -> sigmoid -> nx160x160
    masks = (masks_in.float() @ protos.float().view(c, -1)).sigmoid().view(-1, mh, mw)  # CHW

    downsampled_bboxes = bboxes.clone()
    downsampled_bboxes[:, 0] *= mw / iw
    downsampled_bboxes[:, 2] *= mw / iw
    downsampled_bboxes[:, 3] *= mh / ih
    downsampled_bboxes[:, 1] *= mh / ih

    masks = crop_mask(masks, downsampled_bboxes)  # CHW
    if upsample:
        masks = F.interpolate(masks[None], shape, mode='bilinear', align_corners=False)[0]  # CHW
    return masks.gt_(0.5)
可能有点难理解,下面我们简单分析下
首先对于一张 640x640 的图片来说,YOLOv8-Seg 模型存在两个输出,一个是 output0 可以理解为检测头的输出,它的维度是 1x116x8400;另一个是 output1 可以理解为分割头的输出,它的维度是 1x32x160x160,我们一个个来分析。
针对于检测头的输出 1x116x8400 我们应该已经非常熟悉了,它代表预测框的总数量是 8400,每个预测框的维度是 116(针对 COCO 数据集的 80 个类别而言)
8400
×
116
=
80
×
80
×
116
+
40
×
40
×
116
+
20
×
20
×
116
=
80
×
80
×
(
84
+
32
)
+
40
×
40
×
(
84
+
32
)
+
20
×
20
×
(
84
+
32
)
=
80
×
80
×
(
4
+
80
+
32
)
+
40
×
40
×
(
4
+
80
+
32
)
+
20
×
20
×
(
4
+
80
+
32
)
\begin{aligned} 8400\times116&=80\times80\times116+40\times40\times116+20\times20\times116\\ &=80\times80\times(84+32)+40\times40\times(84+32)+20\times20\times(84+32)\\ &=80\times80\times(4+80+32)+40\times40\times(4+80+32)+20\times20\times(4+80+32)\\ \end{aligned}
8400×116=80×80×116+40×40×116+20×20×116=80×80×(84+32)+40×40×(84+32)+20×20×(84+32)=80×80×(4+80+32)+40×40×(4+80+32)+20×20×(4+80+32)
其中的 4 对应的是 cx, cy, w, h,分别代表的含义是边界框中心点坐标、宽高;80 对应的是 COCO 数据集中的 80 个类别置信度。32 维的向量可以看作是与每个检测框关联的分割 mask 的系数或权重。
针对于分割头的输出 1x32x160x160,一个关键的概念是 prototype masks。它是一个固定数量(32)的基础 mask,每个 mask 的尺寸为 160x160。这些基础 mask 并不直接对应于任何特定的物体或类别,而是被设计为可以线性组合来表示任何可能的物体 mask。
简单来说,模型不直接预测每个物体的完整 mask,而是预测一组基本的 masks(称为 prototype masks)以及每个物体如何组合这些 masks(权重/系数)。这种方法的好处是,模型只需要预测一个较小的 mask 张量,然后可以通过简单的矩阵乘法将这些小 mask 组合成完整的物体 masks。
大家可以把它类比于线性代数中基向量的概念,空间中的任何一个向量是不是都可以表示为一组基向量的线性组合,那么其中的 prototype masks 即 32x160x160 的 mask 张量可以把它理解为一组基向量,而之前在检测框中的 32 维向量可以理解为组合这一组基向量的权重或者说系数。
当我们从检测头得到一个 32 维的向量,分割头得到 32 个基础 masks 时,这个 32 维的向量实际上表示了如何组合这些基础 masks 来得到一个特定物体的 mask。具体来说,我们用这个 32 维向量对 32 个基础 masks 进行线性组合,从而得到与检测框关联的最终 mask。简单来说,这就像你现在有 32 种不同的颜料,检测头给你一个配方(32 维向量),告诉你如何混合这些颜料来得到一个特定的颜色(最终的 mask)。
这样做的优点是我们不需要为每个检测框都预测一个完整的 mask,这个非常消耗内存和计算资源。相反,我们只需要预测一个相对较小的 32 维向量和一个固定数量的基础 masks,然后在后处理中进行组合即可。
值得注意的是代码中框的解码我们并没有像之前的 YOLOv5 一样,通过仿射变换逆矩阵 IM 映射回原图上,而是让它继续保持在 640x640 的图像上,这是因为我们后续在处理 mask 的时候还需要将 boxes 映射到 160x160 的 mask 上。
我们重点来看下 mask 部分的处理,分割头的输出会作为参数直接传递到 process_mask 函数中进行下一步处理,这个函数的目的是将分割头的输出转换为物体的 masks,下面我们简单分析下该函数:
输入:
- protos:分割头的输出,形状为 32x160x160
- masks_in:检测头输出的 32 维向量,形状为 nx32
- bboxes:检测框,形状为 nx4
- shape:输入网络中的图像大小 640x640
- unsample:一个布尔值,表示是否需要上采样 masks 到图像的原始形状
输出:
- 最终的物体 masks
实现细节:
- 首先使用矩阵乘法将 mask_in 与 protos 进行线性组合,得到原始的 masks
- 然后使用 sigmoid 函数将原始 masks 的值映射到 [0,1] 之间的概率值
- 接着会根据图像的 shape 将边界框的大小缩放到 160x160 上
- 使用 crop_mask 函数裁剪 masks
- 如果 unsample 为 True,则使用双线性插值将 masks 上采样到图像的原始形状(640x640)
- 最后使用 gt_(0.5) 将 masks 的值映射到 {0, 1}。大于 0.5 的部分我们认为这个像素有超过 50% 的概率属于前景(目标物体),因此设置为 1;反之,如果概率小于等于 0.5,我们则认为该像素是背景,设置为 0
值得注意的是,crop_masks 函数并不是将原始 masks 进行尺寸的裁剪,它不会改变 masks 的尺寸。它的主要目的是为了 屏蔽 掉那些不在检测框内的部分,这样 mask 里的值只会在检测框内部分为 1,而检测框外的部分为 0。这是因为在 160x160 的 mask 范围内,我们只对检测框内的物体部分感兴趣,其它部分我们并不关注。
4. YOLOv8-Seg推理
通过上面对 YOLOv8-Seg 的预处理和后处理分析之后,整个推理过程就显而易见了。YOLOv8-Seg 的推理包括图像预处理、模型推理、预测结果后处理三部分,其中预处理主要包括 warpAffine 仿射变换,后处理主要包括 boxes 的 decode 解码和 NMS 以及 mask 的处理 三部分。
完整的推理代码如下:
import cv2
import torch
import numpy as np
import torch.nn.functional as F
from ultralytics.data.augment import LetterBox
from ultralytics.nn.autobackend import AutoBackend

def preprocess_letterbox(image):
    letterbox = LetterBox(new_shape=640, stride=32, auto=True)
    image = letterbox(image=image)
    image = (image[..., ::-1] / 255.0).astype(np.float32) # BGR to RGB, 0 - 255 to 0.0 - 1.0
    image = image.transpose(2, 0, 1)[None]  # BHWC to BCHW (n, 3, h, w)
    image = torch.from_numpy(image)
    return image

def preprocess_warpAffine(image, dst_width=640, dst_height=640):
    scale = min((dst_width / image.shape[1], dst_height / image.shape[0]))
    ox = (dst_width  - scale * image.shape[1]) / 2
    oy = (dst_height - scale * image.shape[0]) / 2
    M = np.array([
        [scale, 0, ox],
        [0, scale, oy]
    ], dtype=np.float32)

    img_pre = cv2.warpAffine(image, M, (dst_width, dst_height), flags=cv2.INTER_LINEAR,
                             borderMode=cv2.BORDER_CONSTANT, borderValue=(114, 114, 114))
    IM = cv2.invertAffineTransform(M)

    img_pre = (img_pre[...,::-1] / 255.0).astype(np.float32)
    img_pre = img_pre.transpose(2, 0, 1)[None]
    img_pre = torch.from_numpy(img_pre)
    return img_pre, IM

def iou(box1, box2):
    def area_box(box):
        return (box[2] - box[0]) * (box[3] - box[1])

    left, top = max(box1[:2], box2[:2])
    right, bottom = min(box1[2:4], box2[2:4])
    union = max((right-left), 0) * max((bottom-top), 0)
    cross = area_box(box1) + area_box(box2) - union
    if cross == 0 or union == 0:
        return 0
    return union / cross

def NMS(boxes, iou_thres):

    remove_flags = [False] * len(boxes)

    keep_boxes = []
    for i, ibox in enumerate(boxes):
        if remove_flags[i]:
            continue

        keep_boxes.append(ibox)
        for j in range(i + 1, len(boxes)):
            if remove_flags[j]:
                continue

            jbox = boxes[j]
            if(ibox[5] != jbox[5]):
                continue
            if iou(ibox, jbox) > iou_thres:
                remove_flags[j] = True
    return keep_boxes

def postprocess(pred, conf_thres=0.25, iou_thres=0.45):

    # 输入是模型推理的结果,即8400个预测框
    # 1,8400,116 [cx,cy,w,h,class*80,32]
    boxes = []
    for item in pred[0]:
        cx, cy, w, h = item[:4]
        label = item[4:-32].argmax()
        confidence = item[4 + label]
        if confidence < conf_thres:
            continue
        left    = cx - w * 0.5
        top     = cy - h * 0.5
        right   = cx + w * 0.5
        bottom  = cy + h * 0.5
        boxes.append([left, top, right, bottom, confidence, label, *item[-32:]])

    boxes = sorted(boxes, key=lambda x:x[4], reverse=True)

    return NMS(boxes, iou_thres)

def crop_mask(masks, boxes):

    # masks -> n, 160, 160  原始 masks
    # boxes -> n, 4         检测框,映射到 160x160 尺寸下的
    n, h, w = masks.shape
    x1, y1, x2, y2 = torch.chunk(boxes[:, :, None], 4, 1)  # x1 shape(n,1,1)
    r = torch.arange(w, device=masks.device, dtype=x1.dtype)[None, None, :]  # rows shape(1,1,w)
    c = torch.arange(h, device=masks.device, dtype=x1.dtype)[None, :, None]  # cols shape(1,h,1)

    return masks * ((r >= x1) * (r < x2) * (c >= y1) * (c < y2))

def process_mask(protos, masks_in, bboxes, shape, upsample=False):

    # protos   -> 32, 160, 160 分割头输出
    # masks_in -> n, 32        检测头输出的 32 维向量,可以理解为 mask 的权重
    # bboxes   -> n, 4         检测框
    # shape    -> 640, 640     输入网络中的图像 shape
    # unsample 一个 bool 值,表示是否需要上采样 masks 到图像的原始形状
    c, mh, mw = protos.shape  # CHW
    ih, iw = shape
    # 矩阵相乘 nx32 @ 32x(160x160) -> nx(160x160) -> sigmoid -> nx160x160
    masks = (masks_in.float() @ protos.float().view(c, -1)).sigmoid().view(-1, mh, mw)  # CHW

    downsampled_bboxes = bboxes.clone()
    downsampled_bboxes[:, 0] *= mw / iw
    downsampled_bboxes[:, 2] *= mw / iw
    downsampled_bboxes[:, 3] *= mh / ih
    downsampled_bboxes[:, 1] *= mh / ih

    masks = crop_mask(masks, downsampled_bboxes)  # CHW
    if upsample:
        masks = F.interpolate(masks[None], shape, mode='bilinear', align_corners=False)[0]  # CHW
    return masks.gt_(0.5)

def hsv2bgr(h, s, v):
    h_i = int(h * 6)
    f = h * 6 - h_i
    p = v * (1 - s)
    q = v * (1 - f * s)
    t = v * (1 - (1 - f) * s)

    r, g, b = 0, 0, 0

    if h_i == 0:
        r, g, b = v, t, p
    elif h_i == 1:
        r, g, b = q, v, p
    elif h_i == 2:
        r, g, b = p, v, t
    elif h_i == 3:
        r, g, b = p, q, v
    elif h_i == 4:
        r, g, b = t, p, v
    elif h_i == 5:
        r, g, b = v, p, q

    return int(b * 255), int(g * 255), int(r * 255)

def random_color(id):
    h_plane = (((id << 2) ^ 0x937151) % 100) / 100.0
    s_plane = (((id << 3) ^ 0x315793) % 100) / 100.0
    return hsv2bgr(h_plane, s_plane, 1)

if __name__ == "__main__":

    img = cv2.imread("ultralytics/assets/bus.jpg")

    # img_pre = preprocess_letterbox(img)
    img_pre, IM = preprocess_warpAffine(img)

    model  = AutoBackend(weights="yolov8s-seg.pt")
    names  = model.names
    result = model(img_pre)
    """
    result[0] -> 1, 116, 8400 -> det head
    result[1][0][0] -> 1, 144, 80, 80
    result[1][0][1] -> 1, 144, 40, 40
    result[1][0][2] -> 1, 144, 20, 20
    result[1][1] -> 1, 32, 8400
    result[1][2] -> 1, 32, 160, 160 -> seg head
    """

    output0 = result[0].transpose(-1, -2) # 1,8400,116 检测头输出
    output1 = result[1][2][0]             # 32,160,160 分割头输出

    pred = postprocess(output0)
    pred = torch.from_numpy(np.array(pred).reshape(-1, 38))

    # pred -> nx38 = [cx,cy,w,h,conf,label,32]
    masks = process_mask(output1, pred[:, 6:], pred[:, :4], img_pre.shape[2:], True)

    boxes = np.array(pred[:,:6])
    lr = boxes[:, [0, 2]]
    tb = boxes[:,[1, 3]]
    boxes[:,[0, 2]] = IM[0][0] * lr + IM[0][2]
    boxes[:,[1, 3]] = IM[1][1] * tb + IM[1][2]

    # draw mask
    h, w = img.shape[:2]
    for i, mask in enumerate(masks):

        mask = mask.cpu().numpy().astype(np.uint8) # 640x640
        mask_resized = cv2.warpAffine(mask, IM, (w, h), flags=cv2.INTER_LINEAR)  # 1080x810

        label = int(boxes[i][5])
        color = np.array(random_color(label))

        colored_mask = (np.ones((h, w, 3)) * color).astype(np.uint8)
        masked_colored_mask = cv2.bitwise_and(colored_mask, colored_mask, mask=mask_resized)

        mask_indices = mask_resized == 1
        img[mask_indices] = (img[mask_indices] * 0.6 + masked_colored_mask[mask_indices] * 0.4).astype(np.uint8)

        # contours, _ = cv2.findContours(mask_resized, cv2.RETR_EXTERNAL, cv2.CHAIN_APPROX_SIMPLE)
        # cv2.drawContours(img, contours, -1, random_color(label), 2)

    # draw box
    for obj in boxes:
        left, top, right, bottom = int(obj[0]), int(obj[1]), int(obj[2]), int(obj[3])
        confidence = obj[4]
        label = int(obj[5])
        color = random_color(label)
        cv2.rectangle(img, (left, top), (right, bottom), color = color ,thickness=2, lineType=cv2.LINE_AA)
        caption = f"{names[label]} {confidence:.2f}"
        w, h = cv2.getTextSize(caption, 0, 1, 2)[0]
        cv2.rectangle(img, (left - 3, top - 33), (left + w + 10, top), color, -1)
        cv2.putText(img, caption, (left, top - 5), 0, 1, (0, 0, 0), 2, 16)

    cv2.imwrite("infer-seg.jpg", img)
    print("save done")
推理效果如下图所示:

至此,我们在 Python 上面完成了 YOLOv8-Seg 的整个推理过程,下面我们去 C++ 上实现。
二、YOLOv8-Seg推理(C++)
C++ 上的实现我们使用的 repo 依旧是 tensorRT_Pro,现在我们就基于 tensorRT_Pro 完成 YOLOv8-Seg 在 C++ 上的推理。
1. ONNX导出
首先我们需要将 YOLOv8-Seg 模型导出为 ONNX,为了适配 tensorRT_Pro 我们需要做一些修改,主要有以下几点:
- 输入输出只让 batch 维度动态,宽高不动态
- 增加 transpose 节点交换输出的 2、3 维度
具体修改如下:
1. 在 ultralytics/engine/exporter.py 文件中改动一处
- 326 行:输入只让 batch 维度动态,宽高不动态
- 328/329 行:输出只让 batch 动态,宽高不动态
# ========== exporter.py ==========

# ultralytics/engine/exporter.py第323行
# output_names = ['output0', 'output1'] if isinstance(self.model, SegmentationModel) else ['output0']
# dynamic = self.args.dynamic
# if dynamic:
#     dynamic = {'images': {0: 'batch', 2: 'height', 3: 'width'}}  # shape(1,3,640,640)
#     if isinstance(self.model, SegmentationModel):
#         dynamic['output0'] = {0: 'batch', 2: 'anchors'}  # shape(1, 116, 8400)
#         dynamic['output1'] = {0: 'batch', 2: 'mask_height', 3: 'mask_width'}  # shape(1,32,160,160)
#     elif isinstance(self.model, DetectionModel):
#         dynamic['output0'] = {0: 'batch', 2: 'anchors'}  # shape(1, 84, 8400)
# 修改为:

output_names = ['output0', 'output1'] if isinstance(self.model, SegmentationModel) else ['output0']
dynamic = self.args.dynamic
if dynamic:
    dynamic = {'images': {0: 'batch'}}  # shape(1,3,640,640)
    if isinstance(self.model, SegmentationModel):
        dynamic['output0'] = {0: 'batch'}  # shape(1, 116, 8400)
        dynamic['output1'] = {0: 'batch'}  # shape(1,32,160,160)
    elif isinstance(self.model, DetectionModel):
        dynamic['output0'] = {0: 'batch', 2: 'anchors'}  # shape(1, 84, 8400)
2. 在 ultralytics/nn/modules/head.py 文件中改动一处
- 106 行:添加 transpose 节点交换检测头输出的第 2 和 第 3 维度
# ========== head.py ==========

# ultralytics/nn/modules/head.py第106行,forward函数
# return (torch.cat([x, mc], 1), p) if self.export else (torch.cat([x[0], mc], 1), (x[1], mc, p))
# 修改为:

return (torch.cat([x, mc], 1).permute(0, 2, 1), p) if self.export else (torch.cat([x[0], mc], 1), (x[1], mc, p))
以上就是为了适配 tensorRT_Pro 而做出的代码修改,修改好以后,将预训练权重 yolov8s-seg.pt 放在 ultralytics-main 主目录下,新建导出文件 export.py,内容如下:
from ultralytics import YOLO

model = YOLO("yolov8s-seg.pt")

success = model.export(format="onnx", dynamic=True, simplify=True)
在终端执行如下指令即可完成 onnx 导出:
python export.py
导出过程如下图所示:

可以看到导出的 pytorch 模型的输入 shape 是 1x3x640x640,检测头输出 shape 是 1x8400x116,分割头输出 shape 是 1x32x160x160,符合我们的预期。
导出成功后会在当前目录下生成 yolov8s-seg.onnx 模型,我们可以使用 Netron 可视化工具查看,如下图所示:

可以看到输入节点名是 images,维度是 batchx3x640x640,保证只有 batch 维度动态,检测头输出节点名是 output0,维度是 batchxTransposeoutput_dim_1xTransposeoutput_dim_2,分割头输出节点名是 output1,维度是 batchx32x160x160,保证只有 batch 维度动态,符合 tensorRT_Pro 的格式。
大家不要看到 Transposeoutput_dim_1 和 Transposeoutput_dim_2 就认为这也是动态的,其实输出节点的维度是根据输入节点的维度和模型的结构生成的,而额外的维度 Transposeoutput_dim_1 和 Transposeoutput_dim_2 可能是由模型结构中某些操作决定的,如通道数变换(Transpose)操作的输出维度,而不是由动态维度决定的。因此,通常情况下,这些维度是静态的,不会在推理时改变。
2. YOLOv8-Seg预处理
之前有提到过 YOLOv8-Seg 的预处理部分和 YOLOv5 实现一模一样,因此我们在 tensorRT_Pro 中 YOLOv8-Seg 模型的预处理可以直接使用 YOLOv5 的预处理。
tensorRT_Pro 中预处理的代码如下:
__global__ void warp_affine_bilinear_and_normalize_plane_kernel(uint8_t* src, int src_line_size, int src_width, int src_height, float* dst, int dst_width, int dst_height,
	uint8_t const_value_st, float* warp_affine_matrix_2_3, Norm norm, int edge){

	int position = blockDim.x * blockIdx.x + threadIdx.x;
	if (position >= edge) return;

	float m_x1 = warp_affine_matrix_2_3[0];
	float m_y1 = warp_affine_matrix_2_3[1];
	float m_z1 = warp_affine_matrix_2_3[2];
	float m_x2 = warp_affine_matrix_2_3[3];
	float m_y2 = warp_affine_matrix_2_3[4];
	float m_z2 = warp_affine_matrix_2_3[5];

	int dx      = position % dst_width;
	int dy      = position / dst_width;
	float src_x = m_x1 * dx + m_y1 * dy + m_z1;
	float src_y = m_x2 * dx + m_y2 * dy + m_z2;
	float c0, c1, c2;

	if(src_x <= -1 || src_x >= src_width || src_y <= -1 || src_y >= src_height){
		// out of range
		c0 = const_value_st;
		c1 = const_value_st;
		c2 = const_value_st;
	}else{
		int y_low = floorf(src_y);
		int x_low = floorf(src_x);
		int y_high = y_low + 1;
		int x_high = x_low + 1;

		uint8_t const_value[] = {const_value_st, const_value_st, const_value_st};
		float ly    = src_y - y_low;
		float lx    = src_x - x_low;
		float hy    = 1 - ly;
		float hx    = 1 - lx;
		float w1    = hy * hx, w2 = hy * lx, w3 = ly * hx, w4 = ly * lx;
		uint8_t* v1 = const_value;
		uint8_t* v2 = const_value;
		uint8_t* v3 = const_value;
		uint8_t* v4 = const_value;
		if(y_low >= 0){
			if (x_low >= 0)
				v1 = src + y_low * src_line_size + x_low * 3;

			if (x_high < src_width)
				v2 = src + y_low * src_line_size + x_high * 3;
		}

		if(y_high < src_height){
			if (x_low >= 0)
				v3 = src + y_high * src_line_size + x_low * 3;

			if (x_high < src_width)
				v4 = src + y_high * src_line_size + x_high * 3;
		}

		// same to opencv
		c0 = floorf(w1 * v1[0] + w2 * v2[0] + w3 * v3[0] + w4 * v4[0] + 0.5f);
		c1 = floorf(w1 * v1[1] + w2 * v2[1] + w3 * v3[1] + w4 * v4[1] + 0.5f);
		c2 = floorf(w1 * v1[2] + w2 * v2[2] + w3 * v3[2] + w4 * v4[2] + 0.5f);
	}

	if(norm.channel_type == ChannelType::Invert){
		float t = c2;
		c2 = c0;  c0 = t;
	}

	if(norm.type == NormType::MeanStd){
		c0 = (c0 * norm.alpha - norm.mean[0]) / norm.std[0];
		c1 = (c1 * norm.alpha - norm.mean[1]) / norm.std[1];
		c2 = (c2 * norm.alpha - norm.mean[2]) / norm.std[2];
	}else if(norm.type == NormType::AlphaBeta){
		c0 = c0 * norm.alpha + norm.beta;
		c1 = c1 * norm.alpha + norm.beta;
		c2 = c2 * norm.alpha + norm.beta;
	}

	int area = dst_width * dst_height;
	float* pdst_c0 = dst + dy * dst_width + dx;
	float* pdst_c1 = pdst_c0 + area;
	float* pdst_c2 = pdst_c1 + area;
	*pdst_c0 = c0;
	*pdst_c1 = c1;
	*pdst_c2 = c2;
}
关于预处理部分其实就是调用了上述 CUDA 核函数来实现 warpAffine,由于在 CUDA 中我们是对每个像素进行操作,因此非常容易实现 BGR → RGB,/255.0 等操作。关于代码的具体分析可以参考 YOLOv5推理详解及预处理高性能实现,这边不再赘述。
3. YOLOv8-Seg后处理
在 infer 框架中有关于 YOLOv8-Seg 模型的后处理,因此我们直接 copy 过来即可,它包括检测框的后处理和 mask 的后处理,我们先来看检测框的后处理,代码可参考:yolo.cu#L129
因此我们不难写出 YOLOv8-Seg 的检测框 decode 解码部分的实现代码,如下所示:
static __global__ void decode_kernel_v8_Seg(float *predict, int num_bboxes, int num_classes, float confidence_threshold, float* invert_affine_matrix, float* parray, int MAX_IMAGE_BOXES){

    int position = blockDim.x * blockIdx.x + threadIdx.x;
    if (position >= num_bboxes) return;

    float* pitem            = predict + (4 + num_classes + 32) * position;
    float* class_confidence = pitem + 4;
    float confidence        = *class_confidence++;
    int label               = 0;
    for(int i = 1; i < num_classes; ++i, ++class_confidence){
        if(*class_confidence > confidence){
            confidence = *class_confidence;
            label      = i;
        }
    }

    if(confidence < confidence_threshold)
        return;

    int index = atomicAdd(parray, 1);
    if(index >= MAX_IMAGE_BOXES)
        return;

    float cx         = *pitem++;
    float cy         = *pitem++;
    float width      = *pitem++;
    float height     = *pitem++;
    float left   = cx - width  * 0.5f;
    float top    = cy - height * 0.5f;
    float right  = cx + width  * 0.5f;
    float bottom = cy + height * 0.5f;
    affine_project(invert_affine_matrix, left,  top,    &left,  &top);
    affine_project(invert_affine_matrix, right, bottom, &right, &bottom);

    float *pout_item = parray + 1 + index * NUM_BOX_ELEMENT;
    *pout_item++ = left;
    *pout_item++ = top;
    *pout_item++ = right;
    *pout_item++ = bottom;
    *pout_item++ = confidence;
    *pout_item++ = label;
    *pout_item++ = 1;  // 1 = keep, 0 = ignore
    *pout_item++ = position;  // row_index
}
关于 decode 的具体实现其实就是启动多个线程,每个线程处理一个框的解码,我们会通过仿射变换矩阵 IM 将坐标映射回原图上,值得注意的是,我们在 NUM_BOX_ELEMENT 中新增了一个 position 的元素,该元素在后续处理 mask 时能够告诉我们某个检测框的 mask 权重系数在内存中的位置,也就是说通过 position 我们可以得到检测框的 mask_weights。
关于 decode 代码的详细分析可参考 infer源码阅读之yolo.cu,这边不再赘述,另外关于 NMS 部分的实现无需修改,其具体实现可以参考:yolo_decode.cu#L81
关于 mask 部分的后处理我们可以参考:yolo.cu#L629
因此我们不难写出 YOLOv8-Seg 的分割 mask 后处理部分的实现代码,如下所示:
Box result_object_box(pbox[0], pbox[1], pbox[2], pbox[3], pbox[4], pbox[5]);
// process mask
// reference: https://github.com/shouxieai/infer/blob/main/src/yolo.cu#L629
int row_index = pbox[7];
int mask_dim  = mask_head_output->size(1);

float* mask_weights      = bbox_head_output->gpu<float>(ibatch) + row_index * bbox_head_output->size(2) + num_classes + 4;
float* mask_head_predict = mask_head_output->gpu<float>(ibatch);
float left, top, right, bottom;
float* i2d = job.additional.i2d;
affine_project(i2d, pbox[0], pbox[1], &left,  &top);
affine_project(i2d, pbox[2], pbox[3], &right, &bottom);

float box_width          = right - left;
float box_height         = bottom - top;
float scale_to_predict_x = mask_head_output->size(3) / (float)input_width_;
float scale_to_predict_y = mask_head_output->size(2) / (float)input_height_;
int mask_out_width       = box_width  * scale_to_predict_x + 0.5f;
int mask_out_height      = box_height * scale_to_predict_y + 0.5f;

if(mask_out_width > 0 && mask_out_height > 0){
    int bytes_of_mask_out = mask_out_width * mask_out_height;
    box_mask_output_memory.resize(bytes_of_mask_out).to_gpu();
    box_mask_output_memory.to_gpu(false);
    result_object_box.seg = make_shared<InstanceSegmentMap>(mask_out_width, mask_out_height);
    unsigned char* mask_out_device = box_mask_output_memory.gpu<unsigned char>();
    unsigned char* mask_out_host   = result_object_box.seg->data;

    decode_single_mask(left * scale_to_predict_x, top * scale_to_predict_y, mask_weights,
                        mask_head_predict, mask_head_output->size(3), mask_head_output->size(2),
                        mask_out_device, mask_dim, mask_out_width, mask_out_height, stream_);
    result_object_box.seg->left = left * scale_to_predict_x;
    result_object_box.seg->top  = top  * scale_to_predict_y;
    checkCudaRuntime(cudaMemcpyAsync(mask_out_host, mask_out_device, box_mask_output_memory.bytes(), cudaMemcpyDeviceToHost, stream_));
    image_based_boxes.emplace_back(result_object_box);
}
在 mask 后处理部分我们先要将 box 边界框从原图上映射到 640x640 的图像上,再从 640x640 的图像上映射到 160x160 的 mask 图像上,然后通过 row_index 即 position 获取 mask 的权重系数 mask_weights,接着将权重和基础 masks 送入到 decode_single_mask 函数生成最终的物体 mask。
decode_single_mask 函数最终会调用 CUDA 核函数来对基础 masks 和权重系数进行点积运算,如下所示:
static __global__ void decode_single_mask_kernel(int left, int top, float *mask_weights, float *mask_predict, int mask_width, int mask_height, unsigned char *mask_out, int mask_dim, int out_width, int out_height) {

    // mask_predict to mask_out
    // mask_weights @ mask_predict
    int dx = blockDim.x * blockIdx.x + threadIdx.x;
    int dy = blockDim.y * blockIdx.y + threadIdx.y;
    if (dx >= out_width || dy >= out_height) return;

    int sx = left + dx;
    int sy = top + dy;
    if (sx < 0 || sx >= mask_width || sy < 0 || sy >= mask_height) {
        mask_out[dy * out_width + dx] = 0;
        return;
    }

    float cumprod = 0;
    for (int ic = 0; ic < mask_dim; ++ic) {
        float cval = mask_predict[(ic * mask_height + sy) * mask_width + sx];
        float wval = mask_weights[ic];
        cumprod += cval * wval;
    }

    float alpha = 1.0f / (1.0f + exp(-cumprod));  // sigmoid
    mask_out[dy * out_width + dx] = alpha * 255;
}
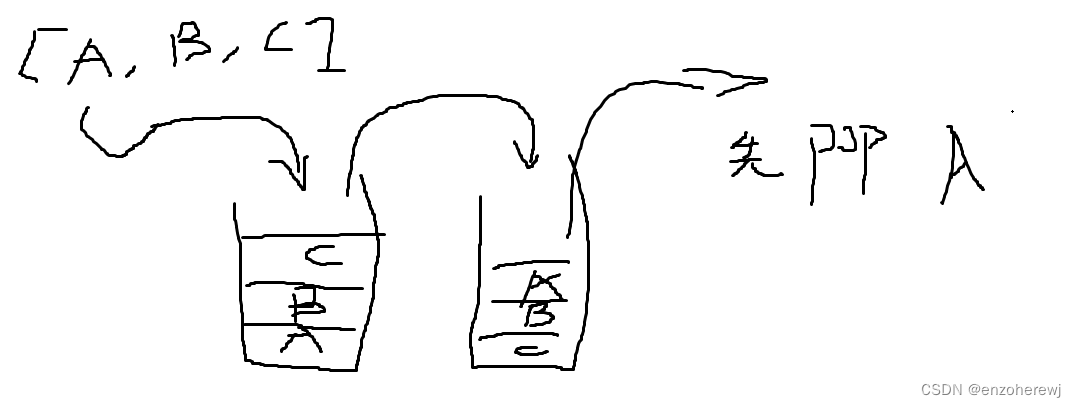
关于 mask 点积运算的具体实现其实就是启动多个线程,每个线程处理一个像素,为了方便理解,博主绘制了一个草图,如下所示:

在核函数中我们启动的线程数为 out_width * out_height,每个线程处理目标框内的一个像素,值得注意是 (sx, sy) 是相对于 mask_width, mask_height 的索引,我们需要通过 sx 和 sy 去获取基础 masks 中对应的值 cval,接着与权重系数中的值 wval 相乘,然后累加。最后我们会使用 sigmoid 函数将累加结果转换为概率值,并将其映射到 0~255 范围内。而 (dx, dy) 是相对于 out_width, out_height 的索引,我们需要通过 dx 和 dy 将最终的 mask 像素值填入到输出的指定位置。
4. YOLOv8推理
通过上面对 YOLOv8-Seg 的预处理和后处理分析之后,整个推理过程就显而易见了。C++ 上 YOLOv8-Seg 的预处理部分可直接沿用 YOLOv5 的预处理,后处理中的 decode 解码需要简单修改,另外还需要新增关于 mask 处理。
我们在终端执行如下指令即可完成推理(注意!完整流程博主会在后续内容介绍,这边只是简单演示)
make yolo_seg
编译图解如下所示:

推理结果如下图所示:

至此,我们在 C++ 上面完成了 YOLOv8-Seg 的整个推理过程,下面我们将完整的走一遍流程。
三、YOLOv8-Seg部署
博主新建了一个仓库 tensorRT_Pro-YOLOv8,该仓库基于 shouxieai/tensorRT_Pro,并进行了调整以支持 YOLOv8 的各项任务,目前已支持分类、检测、分割、姿态点估计任务。
下面我们就来具体看看如何利用 tensorRT_Pro-YOLOv8 这个 repo 完成 YOLOv8-Seg 的推理。
1. 源码下载
tensorRT_Pro-YOLOv8 的代码可以直接从 GitHub 官网上下载,源码下载地址是 https://github.com/Melody-Zhou/tensorRT_Pro-YOLOv8,Linux 下代码克隆指令如下:
git clone https://github.com/Melody-Zhou/tensorRT_Pro-YOLOv8.git
也可手动点击下载,点击右上角的 Code 按键,将代码下载下来。至此整个项目就已经准备好了。也可以点击 here 下载博主准备好的源代码(注意代码下载于 2023/11/7 日,若有改动请参考最新)
2. 环境配置
需要使用的软件环境有 TensorRT、CUDA、cuDNN、OpenCV、Protobuf,所有软件环境的安装可以参考 Ubuntu20.04软件安装大全,这里不再赘述,需要各位看官自行配置好相关环境😄,外网访问较慢,这里提供下博主安装过程中的软件安装包下载链接 Baidu Drive【pwd:yolo】🚀🚀🚀
tensorRT_Pro-YOLOv8 提供 CMakeLists.txt 和 Makefile 两种方式编译,二者选一即可
2.1 配置CMakeLists.txt
主要修改五处
1. 修改第 13 行,修改 OpenCV 路径
set(OpenCV_DIR "/usr/local/include/opencv4")
2. 修改第 15 行,修改 CUDA 路径
set(CUDA_TOOLKIT_ROOT_DIR "/usr/local/cuda-11.6")
3. 修改第 16 行,修改 cuDNN 路径
set(CUDNN_DIR "/usr/local/cudnn8.4.0.27-cuda11.6")
4. 修改第 17 行,修改 tensorRT 路径
set(TENSORRT_DIR "/opt/TensorRT-8.4.1.5")
5. 修改第 20 行,修改 protobuf 路径
set(PROTOBUF_DIR "/home/jarvis/protobuf")
2.2 配置Makefile
主要修改五处
1. 修改第 4 行,修改 protobuf 路径
lean_protobuf := /home/jarvis/protobuf
2. 修改第 5 行,修改 tensorRT 路径
lean_tensor_rt := /opt/TensorRT-8.4.1.5
3. 修改第 6 行,修改 cuDNN 路径
lean_cudnn := /usr/local/cudnn8.4.0.27-cuda11.6
4. 修改第 7 行,修改 OpenCV 路径
lean_opencv := /usr/local
5. 修改第 8 行,修改 CUDA 路径
lean_cuda := /usr/local/cuda-11.6
3. ONNX导出
导出细节可以查看之前的内容,这边不再赘述。记得将导出的 ONNX 模型放在 tensorRT_Pro-YOLOv8/workspace 文件夹下。
4. 源码修改
如果你想推理自己训练的模型还需要修改下源代码,YOLOv8-Seg 模型的推理代码主要在 app_yolo_seg.cpp 文件中,我们就只需要修改这一个文件中的内容即可,源码修改较简单主要有以下几点:
- 1. app_yolo_seg.cpp 329行,“yolov8s-seg” 修改为你导出的 ONNX 模型名
- 2. app_yolo_seg.cpp 10行,将 cocolabels 数组中的类别名称修改为你训练的类别
具体修改示例如下:
test(TRT::Model::FP32, "best")	// 修改1 329行"yolov8s-seg"改成"best"

static const char *cocolabels[] = {"have_mask", "no_mask"};	// 修改2 10行修改检测类别,为自训练模型的类别名称
OK!源码修改好了,Makefile 编译文件也搞定了,ONNX 模型也准备好了,现在可以编译运行了,直接在终端执行如下指令即可:
make yolo_seg
编译过程如下所示:

编译运行成功后在 workspace 文件夹下会生成 engine 文件 yolov8s-seg.FP32.trtmodel 用于模型推理,同时它还会生成 yolov8s-seg_YoloV8-Seg_FP32_result 文件夹,该文件夹下保存了推理的图片。
模型推理效果如下图所示:

OK!以上就是使用 tensorRT_Pro-YOLOv8 推理 YOLOv8-Seg 的大致流程,若有问题,欢迎各位看官批评指正。
结语
博主在这里针对 YOLOv8-Seg 的预处理和后处理做了简单分析,同时与大家分享了 C++ 上的实现流程,目的是帮大家理清思路,更好的完成后续的部署工作😄。感谢各位看到最后,创作不易,读后有收获的看官请帮忙点个👍⭐️
最后大家如果觉得 tensorRT_Pro-YOLOv8 这个 repo 对你有帮助的话,不妨点个 ⭐️ 支持一波,这对博主来说非常重要,感谢各位🙏。
下载链接
- 软件安装包下载链接【提取码:yolo】🚀🚀🚀
- 源代码、权重下载链接【提取码:yolo】
参考
- https://github.com/shouxieai/infer
- https://github.com/ultralytics/ultralytics
- https://github.com/shouxieai/tensorRT_Pro
- https://github.com/Melody-Zhou/tensorRT_Pro-YOLOv8
- YOLOv5推理详解及预处理高性能实现