SAM 是Mata发布的“Segment Anything Model”可以准确识别和提取图像中的对象。 它可以分割任何的图片,但是如果需要分割特定的物体,则需要需要点、框的特定提示才能准确分割图像。 所以本文将介绍一种称为 Grounding Dino 的技术来自动生成 SAM 进行分割所需的框。
除了分割以外,我们还可以通过将 SAM 与 Grounding Dino 和 Stable Diffusion 相结合,获得高度准确图像分割结果,并且对分割后的图像进行细微的更改。
下面就是我们需要的所有的包:
 `%cd /content

 !git clone https://github.com/IDEA-Research/Grounded-Segment-Anything

 %cd /content/Grounded-Segment-Anything
 !pip install -q-r requirements.txt
 %cd /content/Grounded-Segment-Anything/GroundingDINO
 !pip install -q .
 %cd /content/Grounded-Segment-Anything/segment_anything
 !pip install -q .
 %cd /content/Grounded-Segment-Anything
导入必要的包:
 importos, sys

 sys.path.append(os.path.join(os.getcwd(), "GroundingDINO"))

 importargparse
 importcopy

 fromIPython.displayimportdisplay
 fromPILimportImage, ImageDraw, ImageFont
 fromtorchvision.opsimportbox_convert

 # Grounding DINO
 importGroundingDINO.groundingdino.datasets.transformsasT
 fromGroundingDINO.groundingdino.modelsimportbuild_model
 fromGroundingDINO.groundingdino.utilimportbox_ops
 fromGroundingDINO.groundingdino.util.slconfigimportSLConfig
 fromGroundingDINO.groundingdino.util.utilsimportclean_state_dict, get_phrases_from_posmap
 fromGroundingDINO.groundingdino.util.inferenceimportannotate, load_image, predict

 importsupervisionassv

 # segment anything
 fromsegment_anythingimportbuild_sam, SamPredictor
 importcv2
 importnumpyasnp
 importmatplotlib.pyplotasplt


 # diffusers
 importPIL
 importrequests
 importtorch
 fromioimportBytesIO
 fromdiffusersimportStableDiffusionInpaintPipeline


 fromhuggingface_hubimporthf_hub_download
然后我们设置处理的设备:
device = torch.device('cuda' if torch.cuda.is_available() else 'cpu')
然后我们创建一个 GroundingDino 模型的实例。
 defload_model_hf(repo_id, filename, ckpt_config_filename, device='cpu'):
     cache_config_file=hf_hub_download(repo_id=repo_id, filename=ckpt_config_filename)

     args=SLConfig.fromfile(cache_config_file)
     args.device=device
     model=build_model(args)

     cache_file=hf_hub_download(repo_id=repo_id, filename=filename)
     checkpoint=torch.load(cache_file, map_location=device)
     log=model.load_state_dict(clean_state_dict(checkpoint['model']), strict=False)
     print("Model loaded from {} \n => {}".format(cache_file, log))
     _=model.eval()
     returnmodel
 ckpt_repo_id="ShilongLiu/GroundingDINO"
 ckpt_filenmae="groundingdino_swinb_cogcoor.pth"
 ckpt_config_filename="GroundingDINO_SwinB.cfg.py"


 groundingdino_model=load_model_hf(ckpt_repo_id, ckpt_filenmae, ckpt_config_filename, device)
下面开始创建SAM 模型,定义模型并创建一个实例。
 ! wget https://dl.fbaipublicfiles.com/segment_anything/sam_vit_h_4b8939.pth

 sam_checkpoint ='sam_vit_h_4b8939.pth'

 sam_predictor = SamPredictor(build_sam(checkpoint=sam_checkpoint).to(device))
这里我们使用与训练的 vit_h 模型,下面就是扩散模型了:
 sd_pipe=StableDiffusionInpaintPipeline.from_pretrained(
     "stabilityai/stable-diffusion-2-inpainting",
     torch_dtype=torch.float16,
 ).to(device)
然后我们开始测试:
# Load image
defdownload_image(url, image_file_path):
r=requests.get(url, timeout=4.0)
ifr.status_code!=requests.codes.ok:
assertFalse, 'Status code error: {}.'.format(r.status_code)
withImage.open(BytesIO(r.content)) asim:
im.save(image_file_path)
print('Image downloaded from url: {} and saved to: {}.'.format(url, image_file_path))
local_image_path="assets/inpaint_demo.jpg"
image_url="https://images.rawpixel.com/image_800/cHJpdmF0ZS9sci9pbWFnZXMvd2Vic2l0ZS8yMDIyLTA1L3Vwd2s2MTc3Nzk0MS13aWtpbWVkaWEtaW1hZ2Uta293YnN1MHYuanBn.jpg"
download_image(image_url, local_image_path)
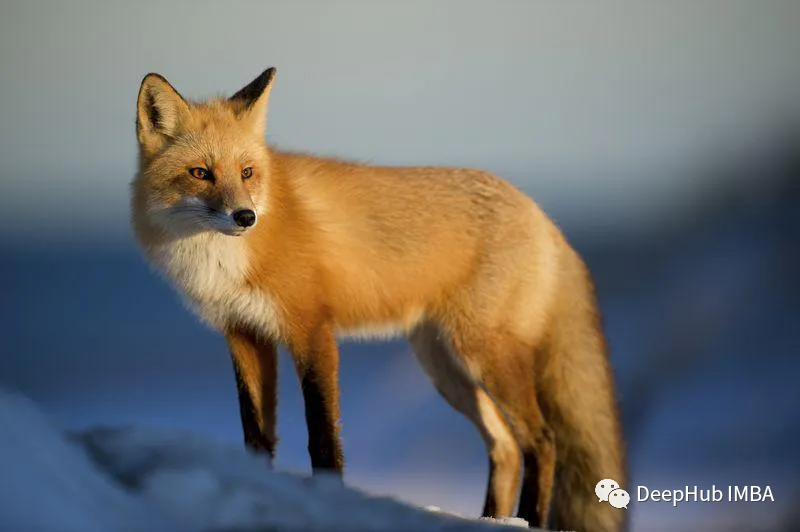
image_source, image=load_image(local_image_path)
Image.fromarray(image_source)
先使用Grounding Dino 进行检测:
 # detect object using grounding DINO
 defdetect(image, text_prompt, model, box_threshold=0.3, text_threshold=0.25):
   boxes, logits, phrases=predict(
       model=model,
       image=image,
       caption=text_prompt,
       box_threshold=box_threshold,
       text_threshold=text_threshold
   )

   annotated_frame=annotate(image_source=image_source, boxes=boxes, logits=logits, phrases=phrases)
   annotated_frame=annotated_frame[...,::-1] # BGR to RGB
   returnannotated_frame, boxes
 annotated_frame, detected_boxes=detect(image, text_prompt="bench", model=groundingdino_model)
 Image.fromarray(annotated_frame)
让我们看看结果:

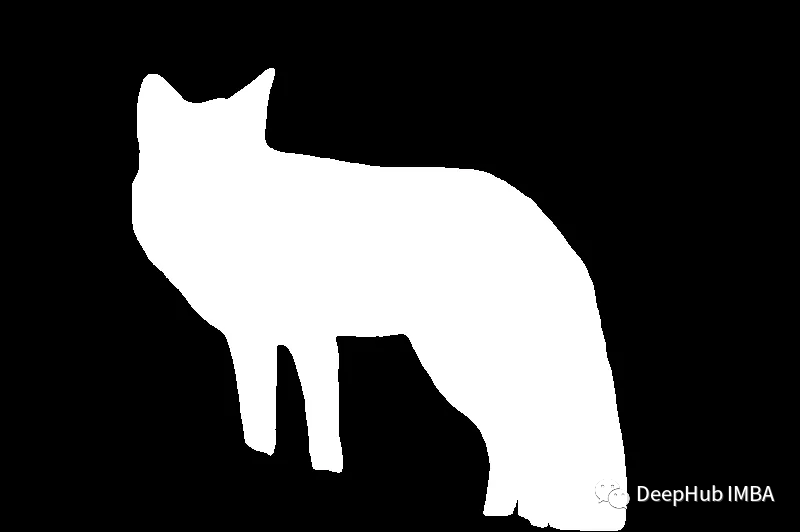
然后使用 SAM 分割这个狐狸:
 defsegment(image, sam_model, boxes):
   sam_model.set_image(image)
   H, W, _=image.shape
   boxes_xyxy=box_ops.box_cxcywh_to_xyxy(boxes) *torch.Tensor([W, H, W, H])

   transformed_boxes=sam_model.transform.apply_boxes_torch(boxes_xyxy.to(device), image.shape[:2])
   masks, _, _=sam_model.predict_torch(
       point_coords=None,
       point_labels=None,
       boxes=transformed_boxes,
       multimask_output=False,
       )
   returnmasks.cpu()

 defdraw_mask(mask, image, random_color=True):
     ifrandom_color:
         color=np.concatenate([np.random.random(3), np.array([0.8])], axis=0)
     else:
         color=np.array([30/255, 144/255, 255/255, 0.6])
     h, w=mask.shape[-2:]
     mask_image=mask.reshape(h, w, 1) *color.reshape(1, 1, -1)

     annotated_frame_pil=Image.fromarray(image).convert("RGBA")
     mask_image_pil=Image.fromarray((mask_image.cpu().numpy() *255).astype(np.uint8)).convert("RGBA")

     returnnp.array(Image.alpha_composite(annotated_frame_pil, mask_image_pil))
 segmented_frame_masks=segment(image_source, sam_predictor, boxes=detected_boxes)
 annotated_frame_with_mask=draw_mask(segmented_frame_masks[0][0], annotated_frame)
 Image.fromarray(annotated_frame_with_mask)
这样就可以通过上面的分割结果为的扩散模型生成掩码:
 # create mask images
 mask=segmented_frame_masks[0][0].cpu().numpy()
 inverted_mask= ((1-mask) *255).astype(np.uint8)


 image_source_pil=Image.fromarray(image_source)
 image_mask_pil=Image.fromarray(mask)
 inverted_image_mask_pil=Image.fromarray(inverted_mask)


 display(*[image_source_pil, image_mask_pil, inverted_image_mask_pil])

绘时我们还需要一个背景的掩码,这个就是上面掩码的反操作
 defgenerate_image(image, mask, prompt, negative_prompt, pipe, seed):
   # resize for inpainting
   w, h=image.size
   in_image=image.resize((512, 512))
   in_mask=mask.resize((512, 512))

   generator=torch.Generator(device).manual_seed(seed)

   result=pipe(image=in_image, mask_image=in_mask, prompt=prompt, negative_prompt=negative_prompt, generator=generator)
   result=result.images[0]

   returnresult.resize((w, h))
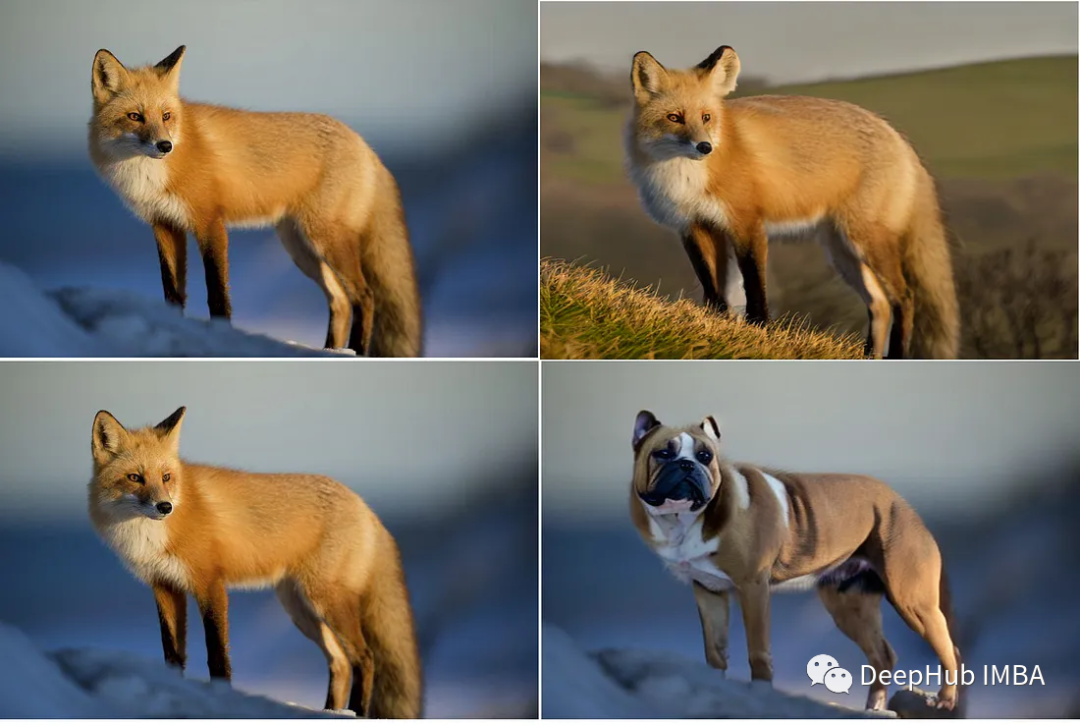
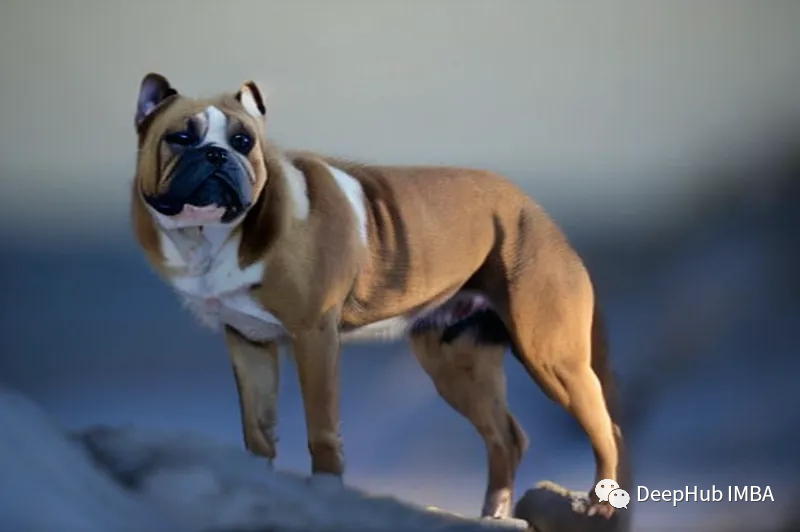
然后我们可以开始改图,输入一个提示:
 prompt=" a brown bulldog"
 negative_prompt="low resolution, ugly"
 seed=-1# for reproducibility

 generated_image=generate_image(image=image_source_pil, mask=image_mask_pil, prompt=prompt, negative_prompt=negative_prompt, pipe=sd_pipe, seed=seed)
 generated_image
或者用上面的背景掩码来修改背景:
 prompt="a hill with grasses ,weak sunlight "
 negative_prompt="people, low resolution, ugly"
 seed=32# for reproducibility

 generated_image=generate_image(image_source_pil, inverted_image_mask_pil, prompt, negative_prompt, sd_pipe, seed)
 generated_image
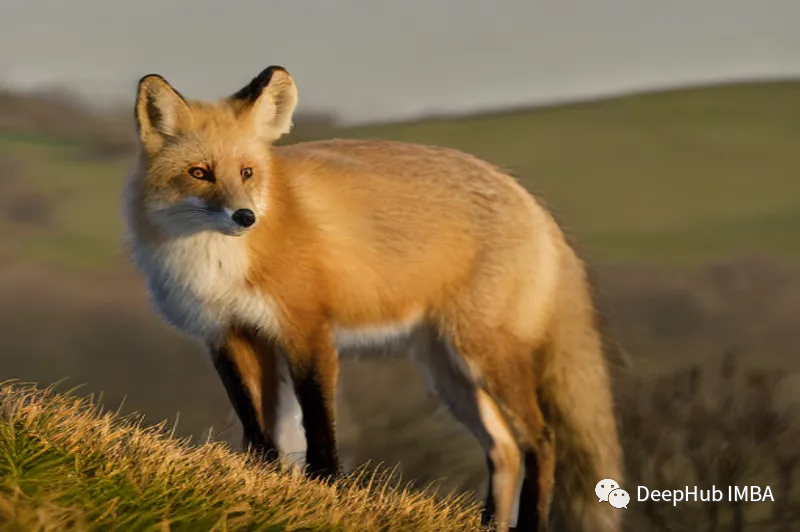
可以看到效果还是很好的
SAM、Grounding Dino 和 Stable Diffusion 的组合为我们提供了强大的工具。这些技术为探索令人兴奋的图像处理世界提供了坚实的基础 并为艺术家和开发者提供巨大的创造潜力。
如果你想在线测试,这里有完整的源代码:
https://avoid.overfit.cn/post/e9e083807a434935910c8116c85c8375
作者:Amir Shakiba