大家好,我是羽峰,今天要和大家分享的是一个基于tensorflow的语义分割项目,网络与U-Net很像。文章会把整个代码进行分割讲解,完整看完,相信你一定会有所收获。
图像分割:提取图像中哪些像素是用于表述已知目标的目标种类与数量问题、目标尺度问题、外在环境干扰问题、物体边缘等,目前分为语义分割、实例分割、全景分割。
目录
1. 认识语义分割
2. 实例演示语义分割
2.1 数据下载
2.2 准备输入与真值
2.3 定义模型
2.4 网络训练
2.5 网络预测
1. 认识语义分割
语义分割结合了图像分类、目标检测和图像分割,通过一定的方法将图像分割成具有一定语义含义的区域块,并识别出每个区域块的语义类别,实现从底层到高层的语义推理过程,最终得到一幅具有逐像素语义标注的分割图像。
图像语义分割方法有传统方法和基于卷积神经网络的方法,其中传统的语义分割方法又可以分为基于统计的方法和基于几何的方法。随着深度学习的发展,语义分割技术得到很大的进步,基于卷积神经网络的语义分割方法与传统的语义分割方法最大不同是,网络可以自动学习图像的特征,进行端到端的分类学习,大大提升语义分割的精确度。
CNN已经在图像分类分方面取得了巨大的成就,涌现出如VGG和Resnet等网络结构,并在ImageNet中取得了好成绩。CNN的强大之处在于它的多层结构能自动学习特征,并且可以学习到多个层次的特征:
- 较浅的卷积层感知域较小,学习到一些局部区域的特征;
- 较深的卷积层具有较大的感知域,能够学习到更加抽象一些的特征。
这些抽象特征对物体的大小、位置和方向等敏感性更低,从而有助于分类性能的提高。这些抽象的特征对分类很有帮助,可以很好地判断出一幅图像中包含什么类别的物体。图像分类是图像级别的,与分类不同的是,语义分割需要判断图像每个像素点的类别,进行精确分割。图像语义分割是像素级别的!但是由于CNN在进行convolution和pooling过程中丢失了图像细节,即feature map size逐渐变小,所以不能很好地指出物体的具体轮廓、指出每个像素具体属于哪个物体,无法做到精确的分割。
针对这个问题,Jonathan Long等人提出了Fully Convolutional Networks(FCN)用于图像语义分割。自从提出后,FCN已经成为语义分割的基本框架,后续算法其实都是在这个框架中改进而来。
FCN原文:https://arxiv.org/abs/1411.4038
FCN原文代码:https://github.com/shelhamer/fcn.berkeleyvision.org
之后又提出了U-Net网络,当然之后还提出了很多方法,但本文是基于U-Net网络来进行语义分割。因为U-Net网络比较简单,所以理解起来会比较容易。
语义分割网络在特征融合时也有2种办法:
- FCN式的逐点相加,对应caffe的EltwiseLayer层,对应tensorflow的tf.add()
- U-Net式的channel维度拼接融合,对应caffe的ConcatLayer层,对应tensorflow的tf.concat()
CNN图像语义分割的基本思路:
- 下采样+上采样:Convlution + Deconvlution/Resize
- 多尺度特征融合:特征逐点相加/特征channel维度拼接
- 获得像素级别的segement map:对每一个像素点进行判断类别
2. 实例演示语义分割
2.1 数据下载
!curl -O https://www.robots.ox.ac.uk/~vgg/data/pets/data/images.tar.gz
!curl -O https://www.robots.ox.ac.uk/~vgg/data/pets/data/annotations.tar.gz
!tar -xf images.tar.gz
!tar -xf annotations.tar.gz
数据集下载好,就开始准备输入图像和目标分割蒙板的路径,也就是将输入与真值图像放入到指定路径下。
import os
#数据存放地址
input_dir = "images/"
target_dir = "annotations/trimaps/"
#图像大小
img_size = (160, 160)
num_classes = 3
batch_size = 32
#存入图像
input_img_paths = sorted(
    [
        os.path.join(input_dir, fname)
        for fname in os.listdir(input_dir)
        if fname.endswith(".jpg")
    ]
)
target_img_paths = sorted(
    [
        os.path.join(target_dir, fname)
        for fname in os.listdir(target_dir)
        if fname.endswith(".png") and not fname.startswith(".")
    ]
)

print("Number of samples:", len(input_img_paths))

for input_path, target_path in zip(input_img_paths[:10], target_img_paths[:10]):
    print(input_path, "|", target_path)
输出结果为

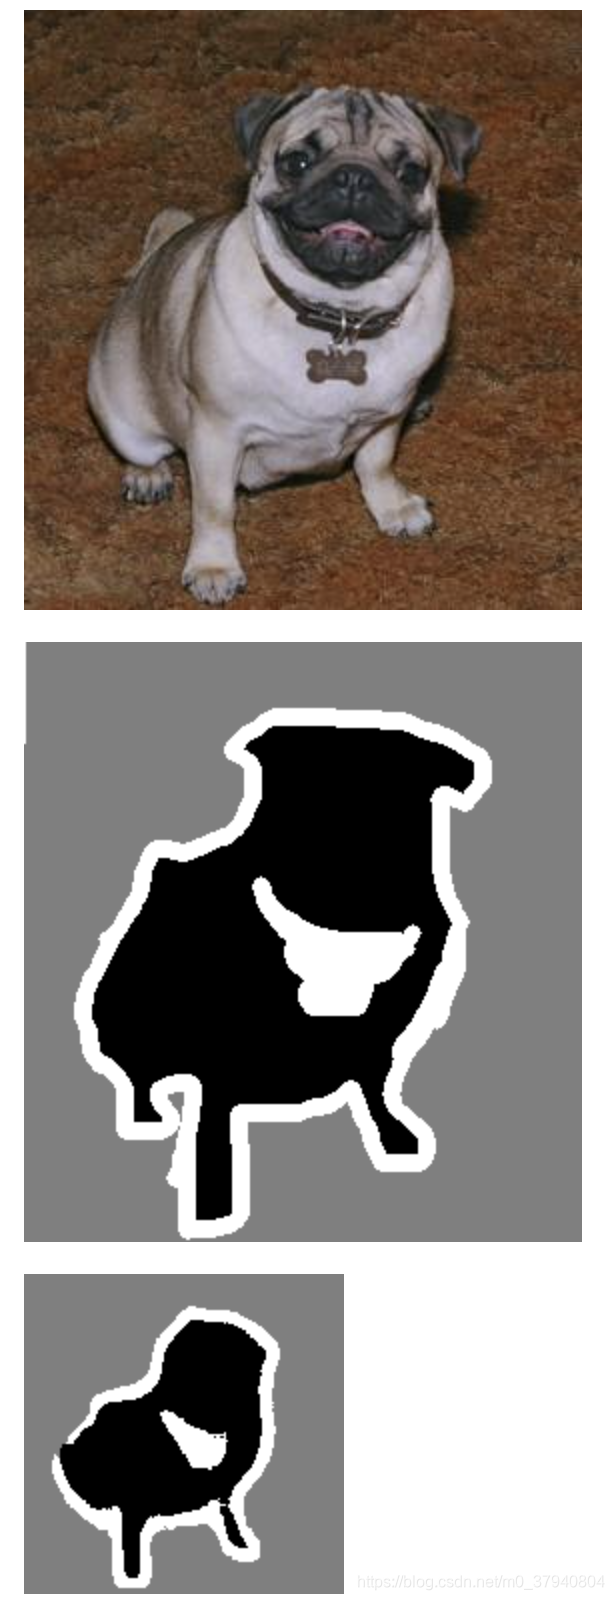
一个输入图像和相应的分割蒙版是什么样的呢,将其中一组可视化一下,看看输入图像和真值是怎样的
from IPython.display import Image, display
from tensorflow.keras.preprocessing.image import load_img
import PIL
from PIL import ImageOps

# 展示输入图像
display(Image(filename=input_img_paths[9]))

# 显示真值
img = PIL.ImageOps.autocontrast(load_img(target_img_paths[9]))
display(img)

2.2 准备输入与真值
准备Sequence类用于以加载和向量化批量数据,Sequence 是进行多进程处理的更安全的方法。这种结构保证网络在每个时期每个样本只训练一次,这与生成器不同。每一个 Sequence 必须实现 __getitem__ 和 __len__ 方法。 如果你想在迭代之间修改你的数据集,你可以实现 on_epoch_end。 __getitem__ 方法应该范围一个完整的批次。
from tensorflow import keras
import numpy as np
from tensorflow.keras.preprocessing.image import load_img


class OxfordPets(keras.utils.Sequence):
    """Helper to iterate over the data (as Numpy arrays)."""
    #数据一些出事参数
    def __init__(self, batch_size, img_size, input_img_paths, target_img_paths):
        self.batch_size = batch_size
        self.img_size = img_size
        self.input_img_paths = input_img_paths
        self.target_img_paths = target_img_paths

    def __len__(self):
        return len(self.target_img_paths) // self.batch_size
    #返回输入与真值的序列
    def __getitem__(self, idx):
        """Returns tuple (input, target) correspond to batch #idx."""
        i = idx * self.batch_size
        batch_input_img_paths = self.input_img_paths[i : i + self.batch_size]
        batch_target_img_paths = self.target_img_paths[i : i + self.batch_size]
        x = np.zeros((self.batch_size,) + self.img_size + (3,), dtype="float32")
        for j, path in enumerate(batch_input_img_paths):
            img = load_img(path, target_size=self.img_size)
            x[j] = img
        y = np.zeros((self.batch_size,) + self.img_size + (1,), dtype="uint8")
        for j, path in enumerate(batch_target_img_paths):
            img = load_img(path, target_size=self.img_size, color_mode="grayscale")
            y[j] = np.expand_dims(img, 2)
            # Ground truth labels are 1, 2, 3. Subtract one to make them 0, 1, 2:
            y[j] -= 1
        return x, y
2.3 定义模型
准备一个类似U-Net的网络模型
from tensorflow.keras import layers


def get_model(img_size, num_classes):
    inputs = keras.Input(shape=img_size + (3,))

    ### 网络前半部分,下采样输入 ###

    # 输入块
    x = layers.Conv2D(32, 3, strides=2, padding="same")(inputs)
    x = layers.BatchNormalization()(x)
    x = layers.Activation("relu")(x)
    # 残差预留处理,方便后续残差计算
    previous_block_activation = x

    # 除特征深度外,块1、2、3结构相同。
    for filters in [64, 128, 256]:
        x = layers.Activation("relu")(x)
        x = layers.SeparableConv2D(filters, 3, padding="same")(x)
        x = layers.BatchNormalization()(x)

        x = layers.Activation("relu")(x)
        x = layers.SeparableConv2D(filters, 3, padding="same")(x)
        x = layers.BatchNormalization()(x)

        x = layers.MaxPooling2D(3, strides=2, padding="same")(x)

        # 该块的残差连接
        residual = layers.Conv2D(filters, 1, strides=2, padding="same")(
            previous_block_activation
        )
        x = layers.add([x, residual])
         #预留下一个残差
        previous_block_activation = x
    ### 网络的后半部分:对输入进行上采样 ###
    #与上半结构类似

    for filters in [256, 128, 64, 32]:
        x = layers.Activation("relu")(x)
        x = layers.Conv2DTranspose(filters, 3, padding="same")(x)
        x = layers.BatchNormalization()(x)

        x = layers.Activation("relu")(x)
        x = layers.Conv2DTranspose(filters, 3, padding="same")(x)
        x = layers.BatchNormalization()(x)

        x = layers.UpSampling2D(2)(x)

        # 残差处理
        residual = layers.UpSampling2D(2)(previous_block_activation)
        residual = layers.Conv2D(filters, 1, padding="same")(residual)
        x = layers.add([x, residual])
        previous_block_activation = x

    # 添加每个像素的分类层
    outputs = layers.Conv2D(num_classes, 3, activation="softmax", padding="same")(x)

    # 定义模型
    model = keras.Model(inputs, outputs)
    return model


# 释放RAM,以防模型定义单元多次运行
keras.backend.clear_session()

# 建立模型
model = get_model(img_size, num_classes)
model.summary()
模型结构预览
Model: "functional_1"
__________________________________________________________________________________________________
Layer (type)                    Output Shape         Param #     Connected to
==================================================================================================
input_1 (InputLayer)            [(None, 160, 160, 3) 0
__________________________________________________________________________________________________
conv2d (Conv2D)                 (None, 80, 80, 32)   896         input_1[0][0]
__________________________________________________________________________________________________
batch_normalization (BatchNorma (None, 80, 80, 32)   128         conv2d[0][0]
__________________________________________________________________________________________________
activation (Activation)         (None, 80, 80, 32)   0           batch_normalization[0][0]
__________________________________________________________________________________________________
activation_1 (Activation)       (None, 80, 80, 32)   0           activation[0][0]
__________________________________________________________________________________________________
separable_conv2d (SeparableConv (None, 80, 80, 64)   2400        activation_1[0][0]
__________________________________________________________________________________________________
batch_normalization_1 (BatchNor (None, 80, 80, 64)   256         separable_conv2d[0][0]
__________________________________________________________________________________________________
activation_2 (Activation)       (None, 80, 80, 64)   0           batch_normalization_1[0][0]
__________________________________________________________________________________________________
separable_conv2d_1 (SeparableCo (None, 80, 80, 64)   4736        activation_2[0][0]
__________________________________________________________________________________________________
batch_normalization_2 (BatchNor (None, 80, 80, 64)   256         separable_conv2d_1[0][0]
__________________________________________________________________________________________________
max_pooling2d (MaxPooling2D)    (None, 40, 40, 64)   0           batch_normalization_2[0][0]
__________________________________________________________________________________________________
conv2d_1 (Conv2D)               (None, 40, 40, 64)   2112        activation[0][0]
__________________________________________________________________________________________________
add (Add)                       (None, 40, 40, 64)   0           max_pooling2d[0][0]
                                                                 conv2d_1[0][0]
__________________________________________________________________________________________________
activation_3 (Activation)       (None, 40, 40, 64)   0           add[0][0]
__________________________________________________________________________________________________
separable_conv2d_2 (SeparableCo (None, 40, 40, 128)  8896        activation_3[0][0]
__________________________________________________________________________________________________
batch_normalization_3 (BatchNor (None, 40, 40, 128)  512         separable_conv2d_2[0][0]
__________________________________________________________________________________________________
activation_4 (Activation)       (None, 40, 40, 128)  0           batch_normalization_3[0][0]
__________________________________________________________________________________________________
separable_conv2d_3 (SeparableCo (None, 40, 40, 128)  17664       activation_4[0][0]
__________________________________________________________________________________________________
batch_normalization_4 (BatchNor (None, 40, 40, 128)  512         separable_conv2d_3[0][0]
__________________________________________________________________________________________________
max_pooling2d_1 (MaxPooling2D)  (None, 20, 20, 128)  0           batch_normalization_4[0][0]
__________________________________________________________________________________________________
conv2d_2 (Conv2D)               (None, 20, 20, 128)  8320        add[0][0]
__________________________________________________________________________________________________
add_1 (Add)                     (None, 20, 20, 128)  0           max_pooling2d_1[0][0]
                                                                 conv2d_2[0][0]
__________________________________________________________________________________________________
activation_5 (Activation)       (None, 20, 20, 128)  0           add_1[0][0]
__________________________________________________________________________________________________
separable_conv2d_4 (SeparableCo (None, 20, 20, 256)  34176       activation_5[0][0]
__________________________________________________________________________________________________
batch_normalization_5 (BatchNor (None, 20, 20, 256)  1024        separable_conv2d_4[0][0]
__________________________________________________________________________________________________
activation_6 (Activation)       (None, 20, 20, 256)  0           batch_normalization_5[0][0]
__________________________________________________________________________________________________
separable_conv2d_5 (SeparableCo (None, 20, 20, 256)  68096       activation_6[0][0]
__________________________________________________________________________________________________
batch_normalization_6 (BatchNor (None, 20, 20, 256)  1024        separable_conv2d_5[0][0]
__________________________________________________________________________________________________
max_pooling2d_2 (MaxPooling2D)  (None, 10, 10, 256)  0           batch_normalization_6[0][0]
__________________________________________________________________________________________________
conv2d_3 (Conv2D)               (None, 10, 10, 256)  33024       add_1[0][0]
__________________________________________________________________________________________________
add_2 (Add)                     (None, 10, 10, 256)  0           max_pooling2d_2[0][0]
                                                                 conv2d_3[0][0]
__________________________________________________________________________________________________
activation_7 (Activation)       (None, 10, 10, 256)  0           add_2[0][0]
__________________________________________________________________________________________________
conv2d_transpose (Conv2DTranspo (None, 10, 10, 256)  590080      activation_7[0][0]
__________________________________________________________________________________________________
batch_normalization_7 (BatchNor (None, 10, 10, 256)  1024        conv2d_transpose[0][0]
__________________________________________________________________________________________________
activation_8 (Activation)       (None, 10, 10, 256)  0           batch_normalization_7[0][0]
__________________________________________________________________________________________________
conv2d_transpose_1 (Conv2DTrans (None, 10, 10, 256)  590080      activation_8[0][0]
__________________________________________________________________________________________________
batch_normalization_8 (BatchNor (None, 10, 10, 256)  1024        conv2d_transpose_1[0][0]
__________________________________________________________________________________________________
up_sampling2d_1 (UpSampling2D)  (None, 20, 20, 256)  0           add_2[0][0]
__________________________________________________________________________________________________
up_sampling2d (UpSampling2D)    (None, 20, 20, 256)  0           batch_normalization_8[0][0]
__________________________________________________________________________________________________
conv2d_4 (Conv2D)               (None, 20, 20, 256)  65792       up_sampling2d_1[0][0]
__________________________________________________________________________________________________
add_3 (Add)                     (None, 20, 20, 256)  0           up_sampling2d[0][0]
                                                                 conv2d_4[0][0]
__________________________________________________________________________________________________
activation_9 (Activation)       (None, 20, 20, 256)  0           add_3[0][0]
__________________________________________________________________________________________________
conv2d_transpose_2 (Conv2DTrans (None, 20, 20, 128)  295040      activation_9[0][0]
__________________________________________________________________________________________________
batch_normalization_9 (BatchNor (None, 20, 20, 128)  512         conv2d_transpose_2[0][0]
__________________________________________________________________________________________________
activation_10 (Activation)      (None, 20, 20, 128)  0           batch_normalization_9[0][0]
__________________________________________________________________________________________________
conv2d_transpose_3 (Conv2DTrans (None, 20, 20, 128)  147584      activation_10[0][0]
__________________________________________________________________________________________________
batch_normalization_10 (BatchNo (None, 20, 20, 128)  512         conv2d_transpose_3[0][0]
__________________________________________________________________________________________________
up_sampling2d_3 (UpSampling2D)  (None, 40, 40, 256)  0           add_3[0][0]
__________________________________________________________________________________________________
up_sampling2d_2 (UpSampling2D)  (None, 40, 40, 128)  0           batch_normalization_10[0][0]
__________________________________________________________________________________________________
conv2d_5 (Conv2D)               (None, 40, 40, 128)  32896       up_sampling2d_3[0][0]
__________________________________________________________________________________________________
add_4 (Add)                     (None, 40, 40, 128)  0           up_sampling2d_2[0][0]
                                                                 conv2d_5[0][0]
__________________________________________________________________________________________________
activation_11 (Activation)      (None, 40, 40, 128)  0           add_4[0][0]
__________________________________________________________________________________________________
conv2d_transpose_4 (Conv2DTrans (None, 40, 40, 64)   73792       activation_11[0][0]
__________________________________________________________________________________________________
batch_normalization_11 (BatchNo (None, 40, 40, 64)   256         conv2d_transpose_4[0][0]
__________________________________________________________________________________________________
activation_12 (Activation)      (None, 40, 40, 64)   0           batch_normalization_11[0][0]
__________________________________________________________________________________________________
conv2d_transpose_5 (Conv2DTrans (None, 40, 40, 64)   36928       activation_12[0][0]
__________________________________________________________________________________________________
batch_normalization_12 (BatchNo (None, 40, 40, 64)   256         conv2d_transpose_5[0][0]
__________________________________________________________________________________________________
up_sampling2d_5 (UpSampling2D)  (None, 80, 80, 128)  0           add_4[0][0]
__________________________________________________________________________________________________
up_sampling2d_4 (UpSampling2D)  (None, 80, 80, 64)   0           batch_normalization_12[0][0]
__________________________________________________________________________________________________
conv2d_6 (Conv2D)               (None, 80, 80, 64)   8256        up_sampling2d_5[0][0]
__________________________________________________________________________________________________
add_5 (Add)                     (None, 80, 80, 64)   0           up_sampling2d_4[0][0]
                                                                 conv2d_6[0][0]
__________________________________________________________________________________________________
activation_13 (Activation)      (None, 80, 80, 64)   0           add_5[0][0]
__________________________________________________________________________________________________
conv2d_transpose_6 (Conv2DTrans (None, 80, 80, 32)   18464       activation_13[0][0]
__________________________________________________________________________________________________
batch_normalization_13 (BatchNo (None, 80, 80, 32)   128         conv2d_transpose_6[0][0]
__________________________________________________________________________________________________
activation_14 (Activation)      (None, 80, 80, 32)   0           batch_normalization_13[0][0]
__________________________________________________________________________________________________
conv2d_transpose_7 (Conv2DTrans (None, 80, 80, 32)   9248        activation_14[0][0]
__________________________________________________________________________________________________
batch_normalization_14 (BatchNo (None, 80, 80, 32)   128         conv2d_transpose_7[0][0]
__________________________________________________________________________________________________
up_sampling2d_7 (UpSampling2D)  (None, 160, 160, 64) 0           add_5[0][0]
__________________________________________________________________________________________________
up_sampling2d_6 (UpSampling2D)  (None, 160, 160, 32) 0           batch_normalization_14[0][0]
__________________________________________________________________________________________________
conv2d_7 (Conv2D)               (None, 160, 160, 32) 2080        up_sampling2d_7[0][0]
__________________________________________________________________________________________________
add_6 (Add)                     (None, 160, 160, 32) 0           up_sampling2d_6[0][0]
                                                                 conv2d_7[0][0]
__________________________________________________________________________________________________
conv2d_8 (Conv2D)               (None, 160, 160, 3)  867         add_6[0][0]
==================================================================================================
Total params: 2,058,979
Trainable params: 2,055,203
Non-trainable params: 3,776
保留验证拆分
import random

# Split our img paths into a training and a validation set
val_samples = 1000
random.Random(1337).shuffle(input_img_paths)
random.Random(1337).shuffle(target_img_paths)
train_input_img_paths = input_img_paths[:-val_samples]
train_target_img_paths = target_img_paths[:-val_samples]
val_input_img_paths = input_img_paths[-val_samples:]
val_target_img_paths = target_img_paths[-val_samples:]

# Instantiate data Sequences for each split
train_gen = OxfordPets(
    batch_size, img_size, train_input_img_paths, train_target_img_paths
)
val_gen = OxfordPets(batch_size, img_size, val_input_img_paths, val_target_img_paths)
2.4 网络训练
训练网络sparse_categorical_crossentropy做损失函数,优化器用rmsprop。并设置 save_best_only=True,只保存损失函数最小的模型。
#配置训练模型。
#我们使用sparse_categorical_crossentropy做损失函数,优化器用rmsprop
#因为我们的目标数据是整数。
model.compile(optimizer="rmsprop", loss="sparse_categorical_crossentropy")

callbacks = [
    keras.callbacks.ModelCheckpoint("oxford_segmentation.h5", save_best_only=True)
]

# 训练模型,在每个epoch结束时进行验证
epochs = 15
model.fit(train_gen, epochs=epochs, validation_data=val_gen, callbacks=callbacks)
输出日志示例
Epoch 1/15
  2/199 [..............................] - ETA: 13s - loss: 5.4602WARNING:tensorflow:Callbacks method `on_train_batch_end` is slow compared to the batch time (batch time: 0.0462s vs `on_train_batch_end` time: 0.0935s). Check your callbacks.
199/199 [==============================] - 32s 161ms/step - loss: 0.9396 - val_loss: 3.7159
Epoch 2/15
199/199 [==============================] - 32s 159ms/step - loss: 0.4911 - val_loss: 2.2709
Epoch 3/15
199/199 [==============================] - 32s 160ms/step - loss: 0.4205 - val_loss: 0.5184
Epoch 4/15
199/199 [==============================] - 32s 159ms/step - loss: 0.3739 - val_loss: 0.4584
Epoch 5/15
199/199 [==============================] - 32s 160ms/step - loss: 0.3416 - val_loss: 0.3968
Epoch 6/15
199/199 [==============================] - 32s 159ms/step - loss: 0.3131 - val_loss: 0.4059
Epoch 7/15
199/199 [==============================] - 31s 157ms/step - loss: 0.2895 - val_loss: 0.3963
Epoch 8/15
199/199 [==============================] - 31s 156ms/step - loss: 0.2695 - val_loss: 0.4035
Epoch 9/15
199/199 [==============================] - 31s 157ms/step - loss: 0.2528 - val_loss: 0.4184
Epoch 10/15
199/199 [==============================] - 31s 157ms/step - loss: 0.2360 - val_loss: 0.3950
Epoch 11/15
199/199 [==============================] - 31s 157ms/step - loss: 0.2247 - val_loss: 0.4139
Epoch 12/15
199/199 [==============================] - 31s 157ms/step - loss: 0.2126 - val_loss: 0.3861
Epoch 13/15
199/199 [==============================] - 31s 157ms/step - loss: 0.2026 - val_loss: 0.4138
Epoch 14/15
199/199 [==============================] - 31s 156ms/step - loss: 0.1932 - val_loss: 0.4265
Epoch 15/15
199/199 [==============================] - 31s 157ms/step - loss: 0.1857 - val_loss: 0.3959

<tensorflow.python.keras.callbacks.History at 0x7f6e11107b70>
2.5 网络预测
可视化预测
# 为验证集中的所有图像生成预测
val_gen = OxfordPets(batch_size, img_size, val_input_img_paths, val_target_img_paths)
val_preds = model.predict(val_gen)
def display_mask(i):
"""Quick utility to display a model's prediction."""
mask = np.argmax(val_preds[i], axis=-1)
mask = np.expand_dims(mask, axis=-1)
img = PIL.ImageOps.autocontrast(keras.preprocessing.image.array_to_img(mask))
display(img)
# 显示验证图像
i = 10
# 显示输入图像
display(Image(filename=val_input_img_paths[i]))
# 显示真值
img = PIL.ImageOps.autocontrast(load_img(val_target_img_paths[i]))
display(img)
#显示网络预测
display_mask(i) # 请注意,该模型仅看到150x150的输入。
至此,今天的分享结束了,希望通过以上分享,你能学习到语义分割的基本流程,基本过程,与图像分割类似,但更具象化。强烈建议新手能按照上述步骤一步步实践下来,必有收获。
今天代码翻译于:https://keras.io/examples/vision/oxford_pets_image_segmentation/,新入门的小伙伴可以好好看看这个网站,很基础,很适合新手。
当然,这里不得不重点推荐一下这三个网站:
https://tensorflow.google.cn/tutorials/keras/classification
https://keras.io/examples
https://keras.io/zh/
其中keras中文网址中能找到各种API定义,都是中文通俗易懂,如果想看英文直接到https://keras.io/,就可以,这里也有很多案例,也是很基础明白。入门时可以看看。
我是羽峰,公众号“羽峰码字”,欢迎来撩
![[亲测经验分享] ubuntu16.04 + cuda8.0安装配置](http://static.blog.csdn.net/images/save_snippets_01.png)